where the cool crafters congregate

Sometimes one hobby just isn't enough. If you're like me, you look at almost everything in the world and wonder, "Can I make that?" That's how I got started making beaded tiaras, jewelry, hats, clothes - and even mosaics, silhouettes, painting ... you name it. My parents both do the same. Hey, I grew up in Vermont where winters are cold and long, so you have to entertain yourself. So if you love making stuff, come join me!

Sunday, August 14, 2011

Come On, Get Hatty!

I firmly believe in wearing hats that serve no real purpose, just because they make me feel happy. Yes, they're good for keep you you warm, dry, and protected from the sun. The hard ones -- and I do have one! -- are useful for protecting your head and keeping your brains intact. But sometimes, it's just nice to wear one because it's so darn pretty.

Many hats are made by stretching an unblocked hat "body" over a shape and letting it dry. It takes the form of the block underneath. I had bought this really funky shaped block on eBay about a year ago, and really wondered what the resulting hat would look like. I mean, it was hard to tell from looking at the wooden block. It has all these bumps and bulges and indentations and multiple "rope lines." I stared and stared and couldn't really imagine what I'd get from it.

Finally, I decided to just make something and see how it would come out. Luckily, Hats by Leko started selling inexpensive paper straw hoods from Japan called Toyo Straw. At $3.99 a hood, compared with $28.00 for sisal, I thought "Oooh - great for practicing!"

So here's how I made my new hat:

I started by setting out (most of) the supplies I'm using to make my new hat. I have a very cheap electric kettle (no thermostat means it won't turn off), petersham ribbon for the band, hat blocks and a spinner, clippy things, pins, scissors, stiffener, needle and thread, wire, saran wrap, and a straw "hood."


Here's a closer up view of supplies. On the right is my funky block that I'm going to use. The head-shaped block on the left I'm going to use in the next installment to make a free-form felt hat.


First, I need to make the straw more pliable by steaming it. This hood is actually made of a type of paper straw so it was cheap enough for me to buy a bunch for experimenting. Nice straw and felt hoods cost $30-50 in case you are wondering why hats cost so much. Don't even ask about the blocks. I stay up late trying to get them cheaper on eBay when other bidders have gone to bed.


The “spinner” raises the block so it’s easier to pull the hood down and work with it. To the right you’ll see my bowl of B&J’s red velvet cake ice cream because this is hard work and I need to keep up my strength.


It's also very important to give your atelier assistant a good bone so that she doesn't bark at you while you're working.


I (and everyone else) covers the hat block with saran wrap to protect it from getting gross with all the steam and dye and stuff.


Another view of the hat block on the spinner, ready for the hood.


So my hood is nice and damp (and HOT) when I stretch it over the block. I pull down with hands on each side - East and West, North and South, etc., etc.


Now I've pressed the hood into the ridges on the block and pinned it down. With straw I try to get the pin BETWEEN the straw so I don't actually break the straw fabric. I've also used a heavy boot lace to force the material into the ridge below the crown (this is called a rope line - in this picture it's decorative, but the bottom one is the cut-off point).


I have to keep steaming the hood, but I can't take it off the block so I made a tent with a (NEW UNUSED!!!!) wee-wee pad that has plastic on it. Really, it was fresh out of the package.


Steam under the tent.


I've used another lace to tie off the bottom rope line.


A close up of the top of the crown.


All tied off! Now we wait. It has to cool down and dry off. This is a "puzzle block," which comes apart so you can pull it out from under the hood without messing it up. Of course this is my first time using it so I could still mess it up.


I let the straw dry overnight and pulled the puzzle pieces of the block off the base.


Then I pulled the pieces out one by one. This allows me to make a hat that's narrower at the bottom than it is at the top without it getting stuck.


Oooo la la, I did not notice before that this block is from Paris!


Here's the straw hat pulled off the block and holding its shape.


The next step is to cut off the bottom excess fabric. I only want a small ridge to fold over to make a hem.


Here it is trimmed. I had to smooth it out a bit.


Next I fold the edge over. The ridge made by the rope line makes it easy.


Starting to take shape. Hey - it's a turban!


Doesn't my model Zelda look cute in it?


I sprayed the inside with hat stiffener to help it hold its shape.


Then I marked the back center spot with a pin. That's where the seam for the ribbon edging will go.


Next I cut a length of millinery wire. It's about 20 gauge wire covered in thread. I'll tuck it into the hem between the layers before sewing it together.


Zelda again. Now I’ve also marked the center front. It’s good to stay oriented.


And here’s the back:


Before finishing off the hem, I bound the millinery wire with "binding wire," snagged from my jewelry tools. (It's steel and won't melt when you heat it so I use it to tie things together when soldering.) They do sell these little joint thingys but my last two teachers said they weren't worth the trouble. So binding wire it is!


After I finished the hem, I decided to edge the hat in ribbon. Millinery ribbon, also called petersham, looks like grosgrain ribbon but the edge isn't bound so it's more flexible.


Now this block makes a 22-inch circumference hat. I think that because the straw I used was a little stiff it came out a little bigger. 22 to 22.5 inches is really normal. I have a TINY head - about 21 inches if that. I can actually wear hats from the toddler department. Anyway, I found this special drawstring liner that I sewed in so that I can make it any size I like. I pick tiny!


I lined up the lining along the edge. If I had thought of this earlier, I would have sewed it in before I but the ribbon edging on. Oh well.


I use clippy things from the beauty supply store to hold ribbon and stuff in place while I'm sewing.


Here it is with the lining. See? Ever so much smaller.


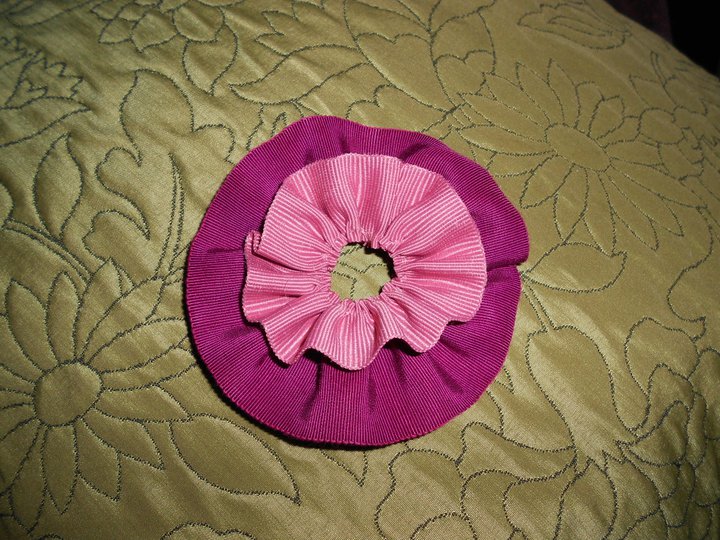
Then I went through my stock and pulled out some more Petersham ribbon to use for a decoration.


The thing about Petersham ribbon that makes it different from grosgrain is that the edge isn't bound. So you can make it wider on one edge and smaller along the other to go around corners and make flowers and things. You can stretch out one side by wetting the ribbon and spreading the fibers with an iron. It's called "swirling.”


I finished the edges of the ribbon with a touch of clear nail polish and then sewed them into "flowers" by running a needle and thread through one side (the "narrow" side) and gathering it and then sewing up the ends. Then I sewed them together to make two layers.


Finally, I sewed the flower onto the hat and finished it with a cute mother of pearl button. All done!


And from the right.


From the left side.


And a view from behind. All done!


My model Zelda sports my new hat!

Sunday, August 7, 2011

Remembering Poppy


Growing up, I had this amazing friend named Poppy Shapiro. She was funny and irreverent and incredibly creative. We spent hours making up satiric ads for Esprit clothes, fake magazines, and ridiculous stories. She went to a private school for the theatrically and artistically inclined, and sadly we fell out of touch for a while. Happily, we reconnected as adults. And she was the same – fun, funny, irreverent, and wildly artistic (rather like her mom). She had her own cleaning business, worked as a tattoo artist (with a lot of very devoted clients) and painted wonderful pictures.

We lost Poppy to an enlarged heart on New Year’s eve this year – and it was a huge, huge loss for me and for all her knew her. To keep her with me a little more, I decided to make a pendant in her honor. Since many people ask me how I do this process, I photographed it (as best as a girl can while holding a flaming torch). I originally posted this on Facebook, January 10, 2011. 

Here it is.

First, I went to Google image to get some templates. No, not actually poppy jewelry pendants, but pictures of poppies and poppy leaves. 


Here is the poppy image that I chose. I picked it not so much to copy as to clearly see the anatomy of the flower. It has six petals.


I then drew my own design on paper, which I can then trace onto the metal.


I did the same for the bale, which I want to look like a poppy leaf. Here's a good picture.


And my design.


After cutting out my poppy design, I traced the pattern onto the metal with a Sharpie (or as my Dad calls them, “Rare Pens”) and then cut it out using a jeweler's saw. It looks like a hack saw on a long handle, but little and dainty.


After cutting out the shape, it is necessary to heat the metal with the torch to relax the metal. This loosens the bonds a bit and allows you to bend the metal. 

Next I shape the poppy using a dap and a dapper’s block. The dap is the round metal thing. The block has a series of deeper indentations and I put the metal in the shallowest, and tap it into shape using a hammer and a dap.


Then I move to deeper indents until I get the shape I want.


After sawing, the edges of the metal are rough. So now that I’ve banged it around a bit and gotten the shape I want, I smooth out the rough edges with a file and then sand paper. You start with a rough grit sand paper – about 220 grit and work down to smoother and smoother grits. 


Then I sand between the petals with a tiny sanding disk that is mounted on my flex(ible) shaft. Yes, it is the very same thing you see at the dentist’s to hold the drill. In fact, a lot of dentists make jewelry on the side. I think this is a much more pleasant use for this apparatus.


Then I polish up the metal using increasingly fine rubber sanding sheets (like sandpaper, but more supple).


The next step is to make the flower stamen. I’m going to do this by making little tiny metal balls and soldering them to the center of the flower. To start, I cut out bits of wire to form the balls. I try really, really hard to make them the same exact length so that they’ll become same-size balls.


I then place the bits of wire onto a charcoal block for melting.


When you really heat the metal, it will melt and ball up.


It has to get red hot for this to work. I circle the flame to make the metal spin so it forms a nice ball.


There it is.


And here's a whole bunch of them. Then I pickle them (an acidic bath to clean off all the char, oxidization and yuckiness) followed by a rinse.


To attach them, I paint them with “flux” (basically borax), which prevents the metal from burning and oxidizing and placing them where I want them to attach. I then put little chips of silver solder (these are bits of silver that, because of what’s combined with it have lower melting points than sterling silver) among the balls. When I heat it, the solder will melt and function as a glue to bond the balls to the flower.


To make the bale, I curled the end of a wire with round nose pliers and then hammered the tail flat.


I marked the edges of the hammered bale so that I can saw it into a leaf shape, based on the image I originally made.


There are several ways to solder metal. The key is that the metal makes very good contact. For something like a ring you would put the solder at the bottom of the seam and let the molten metal ooze up into it using capillary action. In this case, where I’m doing a “large” flat surface against another flat surface, I use a technique called sweat soldering. Basically I melt some solder chips onto the surface of the bale. This gives a nice layer of solder that will melt across the surface.


Then I flip it over and press it firmly against the back of the poppy so it makes good contact. I'm using solder with a lower melting point than the stuff I used for the little balls, so that the balls won't loosen under the heat. The white stuff is the flux I mentioned before, the solution that helps reduce oxidation (the icky black stuff).


Then I pickle it to get it clean.


And polish it up with a series of sand papers and silicone sanding disks, followed by an hour or so in a tumbler. The tumbler contains little steel pins and nuggets that crash against the metal and smooth it out, kind of the way the sand and salt in the ocean smooth out beach glass.


Once it's nicely polished, the last step is to paint the middle part with liver of sulphur. This will cause the metal to oxidize and turn black - like the center of a real poppy.


And here it is!